


First DIY Router
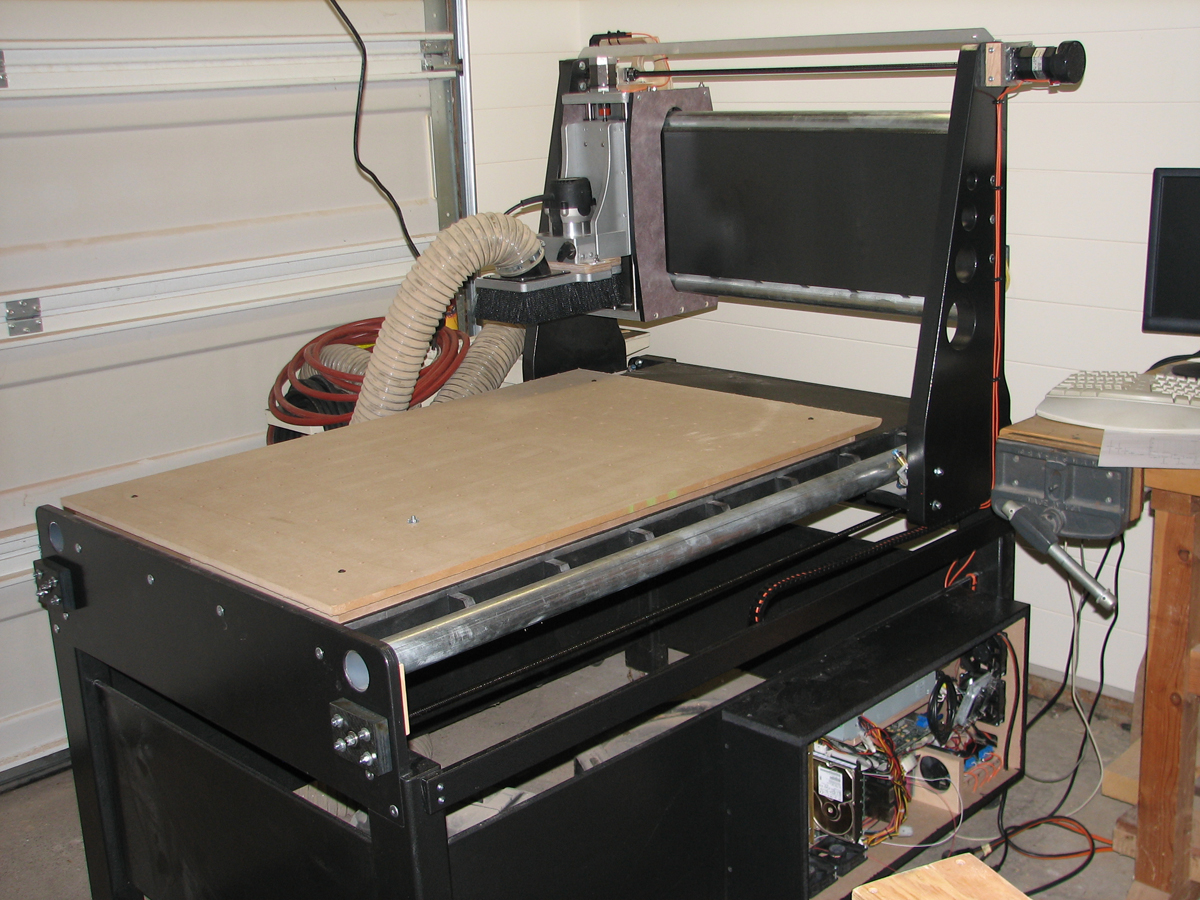
I’d wanted to build a CNC since first seeing pics of homebuilt machines on websites back around 2001-2002. A year or two later, the hobby cnc movement started bringing lower cost software and electronics that was affordable to hobbiests, so I started designing a machine. It took me over 6 years to finish, due to other commitments (rebuilding my house from bare studs and joists) Most homebuilt machines back then were built from MDF, and left a bit to be desired. I wanted something bigger, and stronger than the ones I’d seen. So i based my design on torsion box construction. Easy to build from wood, and yet extremely strong.
First thing to figure out, was how to make everything move without spending a lot of money. An old FWW had an article about building a sliding cutoff table for a tablesaw, using pipe and inexpensive bearings. (Issue 101) I had used this basic design to built a vertical panel saw, using 2” EMT and rollerblade bearings. It worked very well, so I decided to adapt it to the CNC. In order to keep the EMT from bending, I designed the torsion box ribs so they would cradle the conduit. If the torsion box was straight, the conduit would be too. I used our CNC router at work to cut the interlocking ribs from 3/4” baltic birch, and assembled the main table with 1/2” MDF skins. It’s roughly 31” x 60”. The actual usable cutting area is about 29” x 45”. I wanted to be able to cut and line bore a full cabinet side. This gives me some room to spare. The torsion box for the gantry is built similarly. It’s 40” long. The gantry sides are made from 2 layers of 1/2” MDF, with a 5/8” thick birch torsion box like core, along with some aluminum tubes epoxied in to enhance rigidity.
The bearings for the X and Y axis are rollerblade bearings, mounted to 1/4” thick 1-1/4”x1-1/4” aluminum angle. THe 1/4” thick is much stiffer than the 1/8” stuff available at HD. The brass spacers are cut on the table saw with a cutoff sled, from 1/8” pipe nipples from HD.
For the Z axis, the EMT and rollerblade bearings would take up to much space. I found some 3/4” Stainless linear shafts and linear bearings on Ebay for about $80, so designed around those. My original design used threaded rods to hold the bearings tight and hold everything together, but the design was flawed. Once I started assembly, I realized the rods allowed the top and bottom to roll independantly, so I needed to add side and back panels to stiffen it up. Not perfect, but it does the job.
For motion, I’m using acme screws. 1/2-8 2 start screws, which are 4 turns/inch. Multiple start screws are much more efficient than single start screws, so more power is transferred to motion. To mount the screws, I made a jig (simple box with bearings) to hold the screws. I chucked them in a 1/2” drill, and while spinning in the jig, used an angle grinder to grind down the ends to 8mm to mount them in rollerblade bearings. Grind to slightly oversize, then carefully file to finish diameter. Then use a die to thread the ends for a mounting nut to hold the screws in position. The original plan was to make my own drive nuts from Delrin, a hard and slippery plastic. I made a tap from some scrap acme screw and a grinder, and drilled and tapped the Delrin. I then chucked it in my Nova chuck and turned a mounting flange on it. This was very difficult to do. I only made one, for the Z axis. A few years ago, a guy started offering Delrin anti backlash nuts to the hobby cnc community. Anti Backlash nutsget rid of the “play” in a typical screw and nut when you change direction. It’s very important to not have any backlash in a CNC application, as it reults in inaccuracy and poor cut quality. So, I purchased these nuts from www.dumpstercnc.com They work really well, and save me several hours of work, at a cost of about $75.
Back then, there were only a handful of inexpensive motor controllers (known as drives) for the hobbiest, without building your own. I opted for the Xylotex, which was about $175. Stepper motors, at the time, were typically about $100+ each, unless you purchased used surplus from Ebay. It took me 3 auctions, but I found the need 4 identical motors for about $60 each. Today, numerous sources sell chinese made steppers in numerous sizes and configurations for between $30-$60 each. Similar sized motors to mine are only $30 now. I picked up a 24V power supply on Ebay for $10. The PC that runs it is an old Dell GX150, available on Ebay for about $20. I paid $10 for a spare motherboard and processor that I keep for a backup.
Software to control it is Mach3.
Total cost was around $1000.
Today, there are a lot more options available to the CNC hobbiest. Most components are available for much less money, and much higher performance is now attainable.